
Struggling with losing sales at the final step? You’re not alone. Nearly 70% of shoppers abandon their carts because the checkout process is just too complicated. It hurts, right?
But here’s the good news: WooCommerce Direct Checkout can fix that. It streamlines the entire checkout process, sending customers straight from “Add to Cart” to “Pay Now” without any of the usual friction.
Think of it like removing the hurdles on a race track—it’s faster, smoother, and way more likely to get you to the finish line.
In this guide, we’ll dive into how WooCommerce Direct Checkout can help you boost your conversions, lower cart abandonment, and ultimately make more money.
Let’s simplify your checkout process and turn those almost-sales into actual sales.
What is WooCommerce Direct Checkout?
WooCommerce Direct Checkout simplifies the buying process. It removes unnecessary steps, like viewing the cart page, and sends customers straight to checkout. Less hassle, more sales.
Why Use WooCommerce Direct Checkout?
- Reduce Cart Abandonment: Fewer steps mean fewer chances for customers to drop off.
- Faster Checkout: Speeds up the buying process, especially for mobile users who prefer quick, easy transactions.
- Better User Experience: Simplifies the checkout, which customers appreciate—especially those making impulse buys.
Who Should Use It?
- Stores with High Cart Abandonment Rates: If too many customers leave at checkout, this feature is for you.
- Businesses Selling Digital Products: Skip shipping info and unnecessary steps that slow down digital transactions.
- Stores Offering Flash Sales or Limited-Time Deals: Direct checkout speeds up the buying process, ideal for time-sensitive sales.
How to Set Up WooCommerce Direct Checkout Using Our FREE Plugin
I’ve searched and used a lot of plugins to achieve this simple task, but was surprised to find that most plugins do not work as advertised.
If I find a plugin that works after adding a product to the cart from the single product page, it didn’t work when you add products from the shop page!
And if it works on the shop page, it only works with legacy WordPress shortcodes and does not work with the new WooCommerce checkout block!
So, I decided to create this simple plugin for you!
It is a very simple plugin with just a few lines of code; download it, activate it, and you are done!
Install the plugin steps:
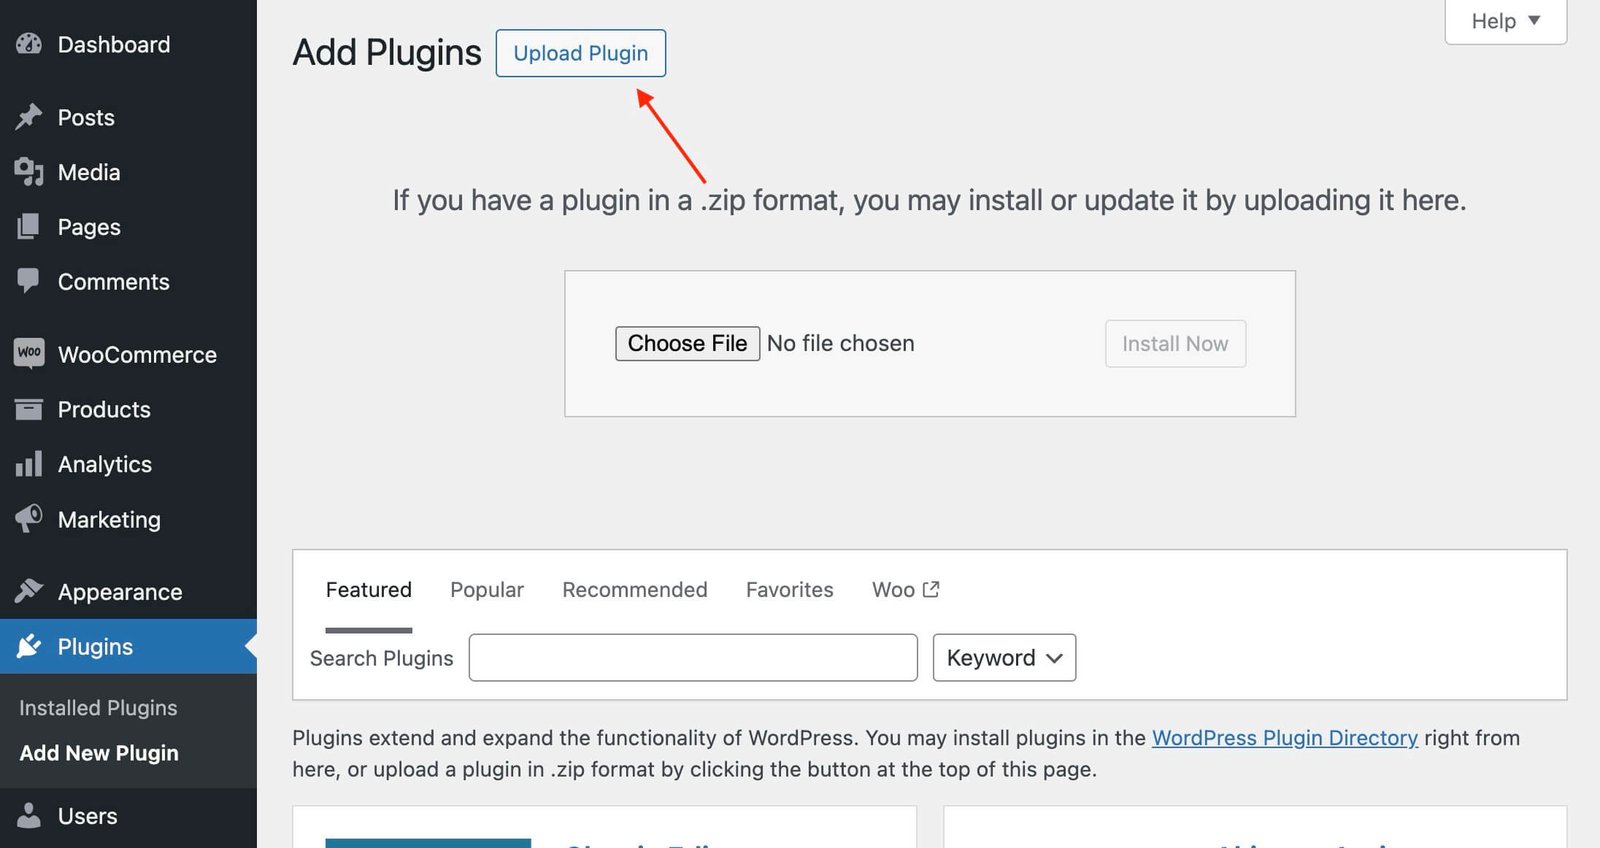
- Download the plugin using the form below.
- Go to your admin dashboard > Plugins > Add New Plugin > Upload Plugin
- Upload the downloaded ZIP file as it is.
- Install and activate.
- No settings, no nothing! It just works.
Download the plugin for free!
No Spam, I Promise!
Don’t want to use a plugin? Use this code snippet!
If you don’t want to download or upload any plugins. No problem, just copy and paste the following code to your child theme’s functions.php file.
This is the same code as my free plugin above.
Adding the Code to Your Theme
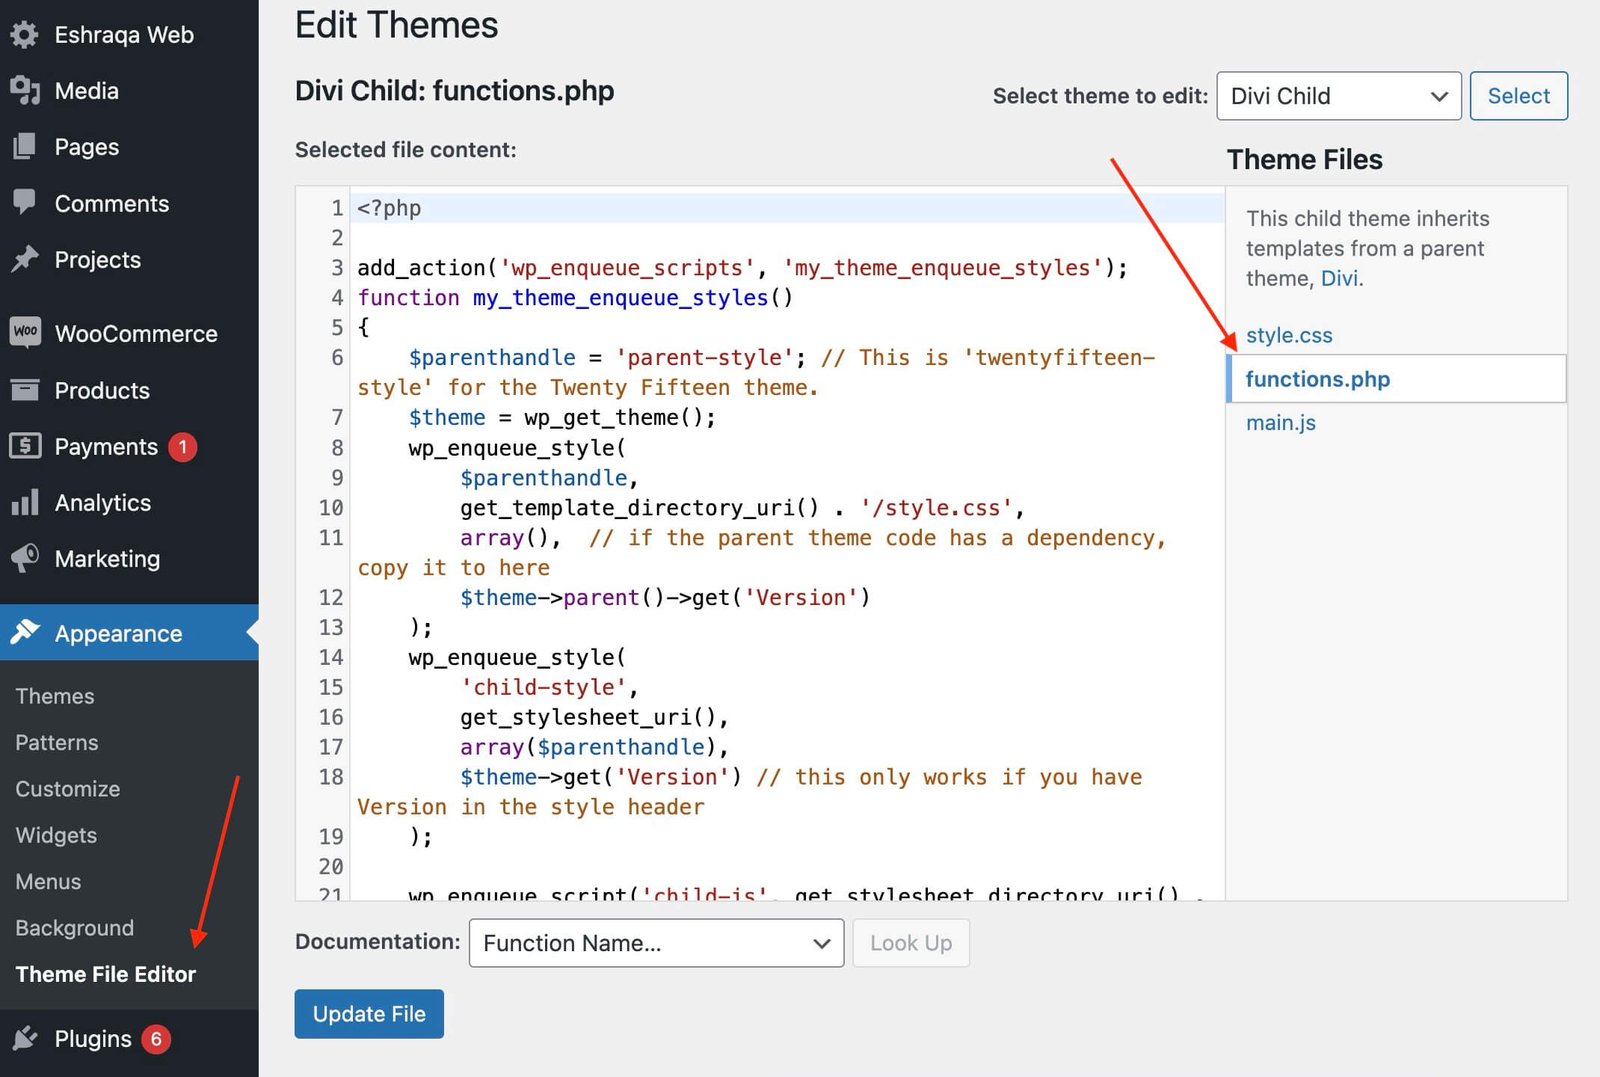
Here’s a step-by-step guide to setting it up:
Access Your CHILD Theme’s Functions File:
- Go to your WordPress dashboard.
- Navigate to Appearance > Theme Editor (if you are using a regular theme).
- If you are using a block theme, access the files using FTP.
- Find and open the
functions.phpfile of your active CHILD theme. - It’s always a good idea to use a child theme or a site-specific plugin to add custom code to avoid losing changes during theme updates.
Insert the Code Snippet:
Copy and paste the following PHP snippet into your functions.php file:
/**
 * Quick Checkout for WooCommerce
 * Version: 1.0
 * Author: Abdelfatah Aboelghi
 * Author URI: <https://divikingdom.com>
 */

add_filter('woocommerce_add_to_cart_redirect', 'dk_wc_redirect_to_checkout');

function dk_wc_redirect_to_checkout($url) {
    return wc_get_checkout_url();
}

// Hook into AJAX add to cart action to trigger checkout redirect
add_action('wp_footer', 'dk_wc_auto_redirect_js');

/**
 * Adds JavaScript to handle AJAX add to cart redirect to checkout.
 */
function dk_wc_auto_redirect_js() {
    // Check if WooCommerce is active
    if (function_exists('is_woocommerce')) :
    ?>
        <script type="text/javascript">
            jQuery(function ($) {
                // Trigger redirect after successful AJAX add to cart
                $(document.body).on('added_to_cart, wc-blocks_added_to_cart', function () {
                    window.location.href = '<?php echo esc_url(wc_get_checkout_url()); ?>';
                });
            });
        </script>
    <?php
    endif;
}
Save the Changes:
- Click on the Update File button to save your changes.
Quick Tips for Using Custom Code:
- Back Up Your Site: Always back up your website before making changes to core files. A small mistake in the code can cause errors or break your site.
- Test the Changes: After adding the snippet, test the checkout flow to ensure it works as expected. Try adding different products to the cart and confirm that you’re redirected directly to checkout.
- Keep It Simple: Avoid adding too many custom modifications at once. Start with this basic snippet and ensure it works before adding any additional changes.
Using a custom code snippet to skip the cart page is a simple, effective way to optimize your WooCommerce store without relying on plugins.
It gives you direct control over the checkout flow, helping you create a smoother, faster buying experience that keeps customers happy and engaged.
How to Use Direct Checkout Links for Different Product Types in WooCommerce
Direct checkout links can be tailored for various product types in WooCommerce, including simple, variable, grouped, and virtual products. Each product type may require a slightly different approach, but the goal remains the same: getting customers to the checkout page quickly and efficiently. Here’s how you can set up direct checkout links for different product types:
1. Simple Products
![WooCommerce Direct Checkout [FREE]: How to Skip the Cart and Boost Your Sales Fast 1](https://divikingdom.com/wp-content/uploads/2024/09/product-id.jpg)
Simple products are the easiest to manage. A single link can be used to add a product to the cart and redirect to checkout.
URL Structure: Replace ID with the product’s ID number. Also, you can define the quantity.
<https://yourstore.com/checkout/?add-to-cart=ID&quantity=1>Example: If your product ID is 123, the link would be:
<https://yourstore.com/checkout/?add-to-cart=123&quantity=2>2. Variable Products
Variable products come with different variations, like size or color. To create a direct checkout link, you need to specify the variation ID.
Finding the Variation ID:
![WooCommerce Direct Checkout [FREE]: How to Skip the Cart and Boost Your Sales Fast 2](https://divikingdom.com/wp-content/uploads/2024/09/variation-id.jpg)
Go to Products > All Products, edit the variable product, and scroll to the Variations section. Each variation will have its own ID.
URL Structure:
Replace ID with the main product ID and VAR_ID with the specific variation ID.
<https://yourstore.com/checkout/?add-to-cart=ID&variation_id=VAR_ID>Example: For a product ID 123 with a variation ID 456, the link would be:
<https://yourstore.com/checkout/?add-to-cart=123&variation_id=456>Conclusion
WooCommerce Direct Checkout can completely change the way your customers shop. It makes the buying process faster, easier, and less frustrating, which means more sales and happier customers.
This isn’t just about making things faster—it’s about removing barriers that stop your customers from completing their purchases.
Every small change you make can have a big impact on your sales and customer satisfaction. So, why not give it a try?
Have questions or tips of your own? Drop a comment below. We’d love to hear how these strategies work for you.
And if you found this guide helpful, share it with your network—let’s help more businesses streamline their checkout process.
Don’t forget to bookmark this guide for future reference. Stay tuned for more tips to boost your WooCommerce store’s performance. Happy selling!



Discussion
Join the conversation